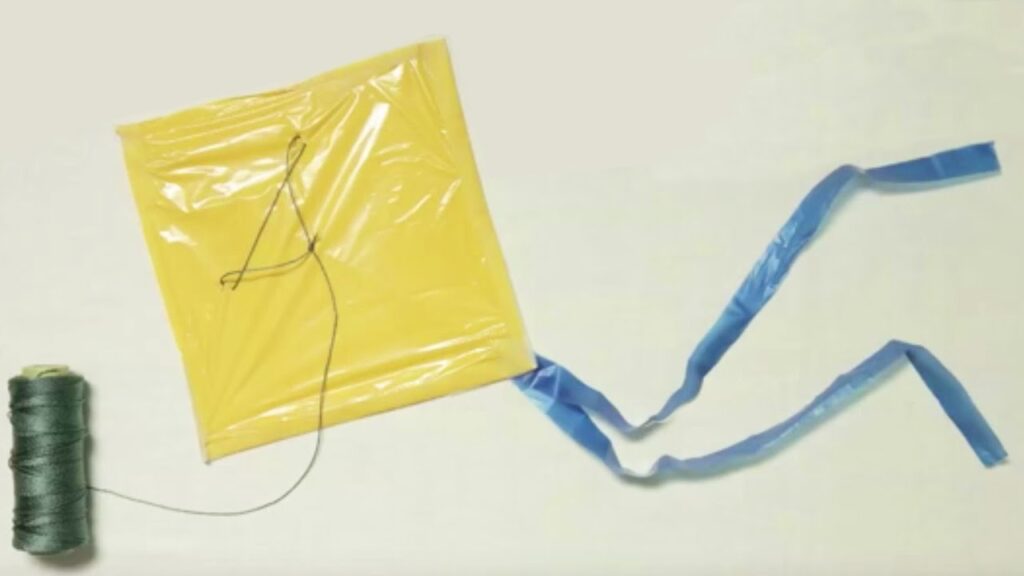
In this article, we will explain how to make a kite with a plastic bag. You don't need any fancy equipment to make this fun activity. Follow our step-by-step instructions and discover how to create your own kite from a simple plastic bag. Enjoy!
Building a kite out of a plastic bag: a fun craft to try!
Building a kite from a plastic bag: a fun craft to try! Kites have long been a fun activity enjoyed by children and even adults. If you're looking for a simple and economical way to spend time outdoors, why not make your own kite out of a plastic bag?
Getting started: You'll need a plastic bag, straws, tape and string. Choose a strong, lightweight plastic bag, preferably without holes or tears.
Step 1: Unfold the plastic bag and cut it into a diamond shape. Make sure opposite sides are the same length for better symmetry.
Step 2: Take two straws and cut them into two equal pieces. Tape them to the center of the diamond in the shape of a cross. These straws will serve as a support to stabilize the kite in the air.
Step 3: Tie the string to the upper and lower ends of the straw cross. Be sure to secure the knots to avoid any risk of them coming loose during flight.
Step 4: Tie another string to the top end of the straw cross, this time to hold and control your kite as it flies.
Step 5: Your kite is ready! Find an open spot, preferably a windy one such as a beach or open park. Hold the string and gently launch your kite into the air, making sure to keep enough tension on the string for it to fly properly.
Have fun making your own kite from a plastic bag. It's a creative activity that can be done with family or friends, while enjoying the great outdoors. So get outside and enjoy the wind as you fly your homemade kite!
How to make a Kite || DIY Project #diy #kite
[arve url="https://www.youtube.com/embed/d8Lc8HS9W-8″/]
How to make an easy kite?
To make an easy kite, here's what you can do:
1. Start by gathering the necessary materials: lightweight paper such as tissue paper, thin, lightweight wooden sticks, thread, tape and scissors.
2. Cut two rectangular pieces of tissue paper, approx. 60 cm long and 40 cm wide.
3. Glue the cross-shaped wooden sticks to the center of the first piece of paper, using tape to secure them.
4. Place the second piece of paper on top of the wooden cross and tape the sides as well.
5. Tie one end of the wire to one of the horizontal arms of the wooden cross, then pass the wire around the other arms of the cross to form a solid structure.
6. Make sure the wire is taut and attach the other end to the opposite end of the first horizontal arm.
7. To stabilize the kite, tie another piece of wire between the bottom of the wooden cross and the middle of the main wire.
8. All that's left is to attach a tail to the kite using tape or small pieces of fabric.
9. Once everything is ready, find a clear, windy spot to fly your kite.
And now you've made an easy kite! Have fun flying it, and be sure to share the experience with friends and family.
How to fly a kite
Title: How to enjoy the art of kite flying?
Introduction: Kites are flying toys that have fascinated young and old alike for centuries. Learning how to handle a kite can provide you with a unique experience while connecting with nature and enjoying the outdoors. Here are a few tips for a successful kite-flying session.
1. Choose the right kite: There are different types of kite for different wind conditions and skills. For starters, opt for a kite that's easy to handle and durable, such as a delta or diamond model.
2. Find the right place: Look for an open area free of obstacles such as trees or power lines. Beaches and parks are often ideal places to fly a kite.
3. Take weather conditions into account: Make sure you choose a day with sufficient wind, but not too strong. A moderate wind is generally ideal for kite flying. Avoid days with strong winds or storms.
4. Set up your kite correctly: Read the manufacturer's instructions carefully to assemble your kite correctly. Make sure the lines are securely tied and untangled.
5. Launch your kite: Hold the handles firmly and step back, letting your arms extend. Walk backwards to create wind and allow your kite to gain altitude.
6. Learn how to handle lines: Once your kite is in the air, subtly use the lines to move it up, down and around. Practice different techniques to master your kite's movements.
7. Be patient: Don't be discouraged if you don't get it right the first time. Flying a kite takes practice and patience. Have fun and enjoy every moment you spend with your kite.
Conclusion: Flying a kite is a fun and relaxing activity, perfect for connecting with nature and unwinding. By following these tips, you'll be well on your way to a successful kite-flying experience. So get ready to enjoy the pleasure of watching your kite dance through the air!
How to make an Afghan kite?
To make an Afghan kite, you'll need the following components:
1. A 60 cm-long wooden stick for the kite's main frame.
2. Two shorter wooden sticks (approx. 30 cm) for the side rails.
3. Colored tissue paper to cover the frame.
4. Sturdy twine to tie sticks and crosspieces.
5. A plastic or metal tube for the handle.
Here are the steps to follow to make your own Afghan kite:
1. Assemble the three sticks to form a cross. Secure them with the string, making sure they are aligned in the center.
2. Wrap the frame with the colored tissue paper, securing it with glue or tape. Make sure the tissue paper is taut, for greater stability in flight.
3. Take the two side rails and attach them perpendicular to the main stick, equidistant from the top and bottom ends of the frame. Again, use string to tie them securely.
4. Tie the sturdy string to the side struts, so as to form a triangular structure at the bottom of the kite. This will help stabilize the flight.
5. Cut a length of twine long enough to be tied to the top rail of the frame, and secure it with a loop.
6. Thread this loop through the plastic or metal tube to form the kite's handle.
7. Finally, tie another length of string to the lower loop of the frame, which will serve as a control line for flying the kite.
Now your Afghan kite is ready to fly! Don't forget to choose a windy day to get the most out of your kite. Good luck!
What materials are needed to make a kite?
To make a kite, you need the following materials:
1. A frame : It can be made of bamboo, wood or fiberglass, and gives the kite its structure.
2. A sail : It can be made of paper, fabric or plastic. It's attached to the frame and catches the wind to make the kite fly.
3. Lines : They are connected to the kite, allowing it to be steered and controlled. They can be made of nylon or polyester.
4. Handles : they are used to hold the lines and give instructions to the kite.
In addition to these basic materials, you can also use additional accessories such as tails to stabilize the kite, straps to facilitate take-off, or decorations to make your kite unique.
It's important to note that kite building can vary depending on the model you wish to build. Some kites may require specific additional materials.
How can I make a kite out of a plastic bag?
To make a kite from a plastic bag, you first need to cut out the bag to obtain a diamond shape. Next, attach a bamboo structure at the ends of the bag to hold it in place. Last but not least, tie a strong string at the top of the kite and add a light tail for balance.
What additional materials do I need to make a kite from a plastic bag?
To make a kite out of a plastic bag, you'll need additional materials such as wooden rodsfrom adhesive tapea strong string and a metal ring.
What are the steps involved in making a kite from a plastic bag?
The steps for making a kite from a plastic bag are as follows:
1. Take a lightweight, sturdy plastic bag.
2. Cut the bag in half to obtain two rectangular pieces.
3. Use a ruler to trace the shape of a kite on one of the pieces of bag.
4. Cut out the kite shape with scissors.
5. Take the other piece of bag and cut it into strips to make the ties.
6. Attach the straps to the corners of the kite with strong adhesive tape.
7. Attach a strong string to the kite's central attachment.
8. Decorate the kite as you like with markers or stickers.
9. Tie the other end of the string to a spool or solid object.
10. Go outside to an open, windy place.
11. Pull the string to launch your kite into the air and enjoy!
Remember to take all necessary precautions when handling the plastic bag, and to fly the kite in an appropriate and safe place. Have fun!
How can I make my kite more stable when it's made with a plastic bag?
To make your kite more stable when made from a plastic bag, you can reinforce its structure with bamboo chopsticks or metal rods. This will provide a solid base for the kite to fly more easily and stay in place even in strong winds.
Can I use other types of plastic bags to make a kite?
NoThe use of plastic bags specifically designed for kite building is recommended to guarantee kite strength and aerodynamics. The use of other types of plastic bags may compromise kite performance and safety.
Are there any models or specific instructions for making a kite from a plastic bag?
Yes, there are many models and specific instructions for making a kite from a plastic bag. These can be found on DIY sites or in specialized books. It's important to follow the instructions carefully to ensure the safety and smooth operation of the kite.
Are there any safety precautions to be taken when making a kite with a plastic bag?
Yes, there are a few safety precautions to take when building a kite with a plastic bag: make sure you use a strong, durable plastic bag to prevent it from tearing during the flight; check that the bag is free of sharp or dangerous objects that could damage the kite or injure someone; avoid building kites near power lines to prevent the risk of electric shock; use a sufficiently strong rope and check its condition regularly, take care to practice this activity in an open, unobstructed spaceaway from areas frequented by people.
How high can I fly my plastic bag kite?
The maximum height to which you can fly your plastic bag kite will depend on several factors, such as the size and weight of the bag, wind strength and weather conditions. It is recommended not to fly kites at an altitude higher than 30 metres.to avoid any risk to people or structures in the vicinity.
What are the ideal weather conditions for flying a kite with a plastic bag?
The ideal weather conditions for flying a kite with a plastic bag are constant, moderate wind. A medium-force wind (between 10 and 20 km/h) is ideal for the kite to take off properly. However, it's important to mention that the plastic bag can be affected by excessively strong winds, so it's best to choose a day with a low wind speed. gentle, constant breeze.
How can I repair my kite in the event of a tear or damage?
To repair your kite in case of tear or damage, you'll first need to assess the extent of the damage. If the tear is minor, you can use special kite tape to repair it temporarily. If the tear is more serious, you'll need to use repair fabric and special kite glue. Feel free to consult online tutorials for detailed instructions on kite repair.
In conclusion, making a kite from a plastic bag is a fun and affordable activity for children and adults alike. With just a few simple steps, you can create your own personalized kite using everyday materials. Using HTML tags allows you to highlight the key instructions you need to follow to make your project a success. Don't forget to always be environmentally conscious by recycling materials when you're finished. So grab a plastic bag, follow the steps and get ready to watch your kite soar high into the sky. Happy making!


